How to Get Better Virtual Try-On Results: Photos, Lighting, Clothing and Accuracy
Two people can use the exact same virtual try-on tool and get completely different results. Here’s exactly how your photo, lighting, background, and clothing choice affect accuracy, and the specific fixes that make previews look genuinely realistic.

How to Get Better Virtual Try-On Results: Photos, Lighting, Clothing and Accuracy
Two people can use the exact same virtual try-on tool and get completely different results. One gets a clean, convincing preview. The other gets something warped and unusable, an arm that bends wrong, a hemline that floats, a garment that looks pasted on rather than worn. The technology didn’t change between those two attempts. The input photo did.
This is the part of virtual try-on that’s entirely within your control, and it’s also the part almost no one thinks about before they’re already disappointed with a result.
Here’s what actually determines whether your try-on looks real or looks broken.
Start With the Right Photo
Every virtual try-on system works by detecting your body’s landmarks, shoulders, waist, hips, limb angles, then mapping the garment onto that structure. If the system can’t read your body clearly from the photo, nothing downstream works well, no matter how good the AI is.
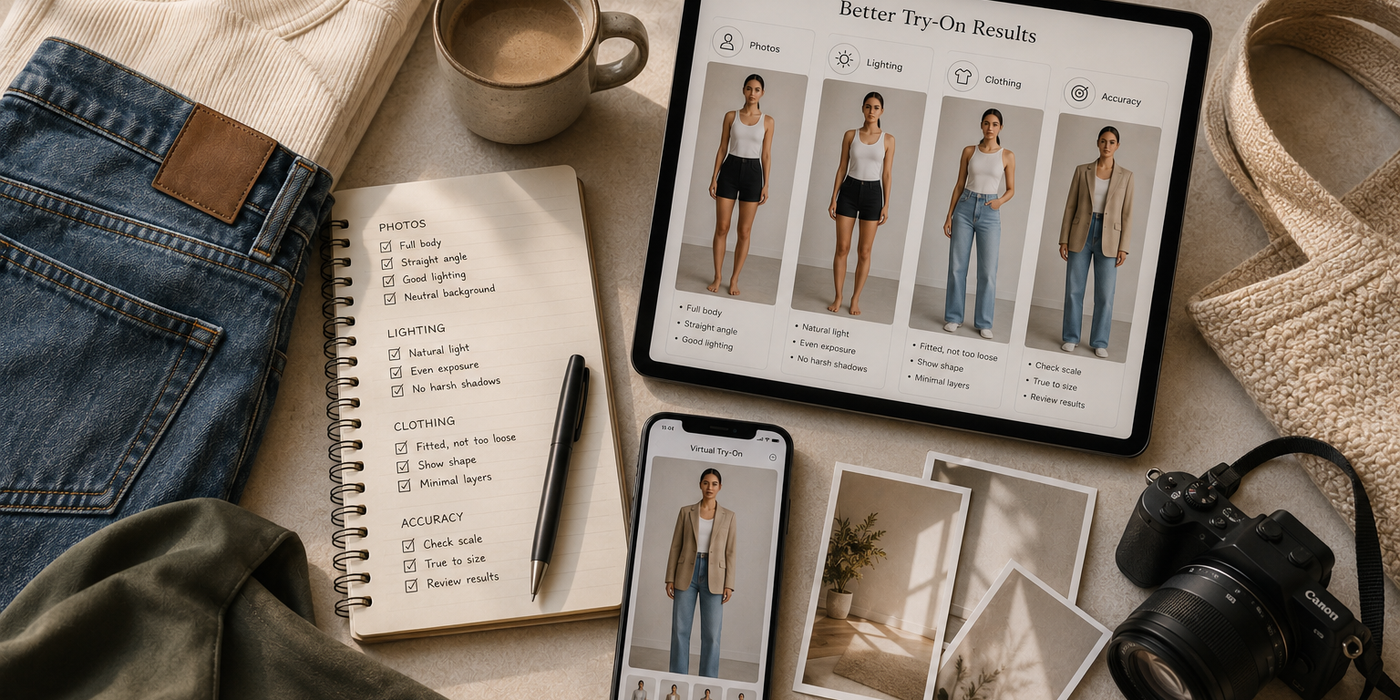
1. Use a Full-Body Photo
A cropped photo, even a good one, gives the system less to work with. Full-body shots let the AI understand your actual proportions rather than guessing at what it can’t see. This matters most for anything below the waist, since a photo cropped at the hips gives the AI nothing to anchor pants, skirts, or dresses to.
2. Face the Camera
A straight-on, front-facing pose gives the clearest read on your body shape. Angled or three-quarter poses look more natural for a regular photo, but they distort how AI systems interpret proportion, since the camera is seeing a foreshortened version of your actual width and shape.
3. Avoid Extreme Poses
Hands on hips, one leg forward, a dramatic lean, these all look fine to the human eye but confuse landmark detection. A neutral standing pose, arms relaxed at your sides, gives the system the cleanest possible read.
4. Use a Clear, High-Quality Image
Blurry, low-resolution, or heavily compressed photos lose the fine detail the AI needs to map edges accurately. You don’t need professional photography. You need a photo taken in decent light with a phone camera that isn’t struggling in low light or overcompressing on send.
Why Lighting Matters
Lighting affects two things at once: how accurately the AI can detect your body’s edges, and how accurately colors render once a new garment is placed on you.
Harsh overhead lighting creates shadows that can be misread as the edge of a limb or the fold of clothing that isn’t there. Dim indoor lighting, especially warm yellow bulbs, shifts how colors appear, which means a white shirt might render with a yellow cast that has nothing to do with the garment itself. Natural, even daylight, ideally indirect rather than direct sun, gives the most accurate read on both your body’s shape and true color.
If you’re taking the photo specifically to reuse for future try-ons, which is common with wardrobe-aware tools that store your photo for repeated use, it’s worth taking a few extra minutes to get the lighting right once, since you’ll be relying on that same photo for every preview afterward.
Choose the Right Background
A cluttered or busy background does more damage than most people expect. When there’s a lot going on behind you, patterned wallpaper, furniture, other people, the AI has to work harder to separate you from everything around you, and that extra ambiguity shows up as inaccuracies in the final render.
A plain wall or an uncluttered space gives the clearest separation between you and the background, which translates directly into cleaner body detection and a more accurate garment placement.
What to Wear in Your Original Photo
This one surprises people: what you’re wearing in your base photo affects how well new clothes render onto you. Baggy, oversized clothing hides your actual body shape, which means the AI is essentially guessing at proportions it can’t see. Fitted, simple clothing gives the system an accurate read of your real silhouette, which every future try-on is then built on top of.
You don’t need to take the photo in anything special. A fitted t-shirt and leggings or similarly close-fitting basics work well. The goal isn’t the outfit itself, it’s giving the AI an honest read of your body underneath whatever gets tried on next.
Why Some Clothes Are Harder for AI to Render
Not every garment is equally easy for virtual try-on to render. Some styles are simply more complex because their shape, structure, or details are harder for AI to interpret accurately.
Ready to upgrade your wardrobe?
Get the Elara app for AI-powered styling and virtual try-ons.
● Flowing Fabrics: Dresses and wide-leg trousers depend on how fabric falls and moves, which is difficult to recreate from a static image.
● Layered Outfits: Jackets over shirts require the AI to understand depth and how different pieces overlap.
● Patterns and Textures: Detailed patterns and textures can become distorted when they are mapped around the body’s contours.
● Accessories and Structured Pieces: Bags, belts, and stiff outerwear can be harder to position and render naturally because they don’t drape like soft fabric.
These limitations don’t make such garments unusable. They simply mean that a slightly less polished result doesn’t necessarily mean there was a problem with your photo.
Why Virtual Try-On Results Sometimes Look Unrealistic
When a result looks off, warped seams, a garment that seems to float rather than sit on your body, or an oddly shaped sleeve, it usually comes down to one of the basics above. The photo may not clearly show your body, the lighting may be uneven, the background may be distracting, or the garment itself may be difficult to render.
The AI can only work with the information it receives. A clearer photo, better lighting, and a simpler background give it a better starting point, which can lead to a more convincing result.
How to Judge Whether a Try-On Result Is Actually Useful
A try-on result doesn’t need to look perfect to be useful. What matters is whether it gives you a reasonable sense of the garment’s silhouette on your body, how the color looks against your skin tone, and whether the overall proportions feel right.
Small imperfections around the edges may not matter if those three things look convincing. But if the silhouette, color, or proportions look noticeably wrong, the result isn’t reliable enough to guide your decision.
What a Better Try-On Result Still Can’t Tell You
Even a highly realistic try-on with good lighting, a clear background, and a well-shot photo can’t tell you everything. It still can’t reliably tell you your exact size, how the fabric feels, how much it stretches, or how the garment moves when you walk.
Better inputs improve what virtual try-on is designed to show: appearance, silhouette, and color. They don’t change the fundamental limits of the technology.
Frequently Asked Questions
Q1. Do I need a professional photo for good virtual try-on results?
No. A clear phone photo is usually enough. For better results, face the camera, use good natural light, wear relatively fitted clothing, and choose a plain background.
Q2. Why Does the Same App Give Better Results With Some Clothes Than Others?
Some garments are simply harder for AI to render accurately. Flowing fabrics, layered outfits, and heavily patterned pieces can be more difficult to reproduce, so differences in quality aren’t necessarily caused by your photo.
Q3. Should I retake my base photo if my results look consistently off?
Yes, especially if you’re using a tool that stores and reuses one photo across multiple try-ons. Fixing the base photo once tends to improve every result that follows, rather than troubleshooting each try-on individually.
The Real Secret to Consistent Try-On Previews
Virtual try-on accuracy isn’t just a function of how good the underlying AI is. It’s a function of what you give it to work with. A full-body, front-facing photo, taken in even natural light, against a plain background, in fitted clothing, will consistently outperform a rushed selfie, regardless of which app or tool you’re using. The technology has gotten genuinely good. Give it a fair starting point, and it shows.
To learn more about how virtual try-on tools evaluate fit, reducing returns, and integrating with online stores, explore our “complete guide to virtual try-on clothes before buying online”.
Your AI Stylist is Here.
live on the App Store & Google Play
Available on iOS and Android for seamless access anytime, anywhere.